What a Concrete Cut of Saw Actually Demands Before You Ever Start the Engine
Most concrete cutting failures happen before the blade ever touches the slab. A clean, precise concrete cut of saw is the product of preparation — not horsepower. Whether you’re cutting control joints in a freshly poured residential driveway or opening a trench through a post-tensioned parking deck, the decision-making process that happens in the first five minutes determines whether your cut runs straight, your blade lasts the full job, and your crew goes home without a trip to the ER. This guide walks you through every technical layer of that process, from substrate analysis to blade selection to final pass depth, the way a senior field consultant would explain it to a crew that’s done this a hundred times but still wants to get it right.
Reading the Slab Before You Select a Blade
Concrete is not a uniform material, and treating it like one is the single most expensive mistake a saw operator can make. Before you mount a blade, you need to know the compressive strength of the mix (measured in PSI), the aggregate type — whether it’s hard granite, softer limestone, or recycled material — and the presence of any embedded reinforcement like rebar, wire mesh, or post-tensioning cables. Each of these variables directly dictates which diamond blade segment bond you need.
Hard aggregate in high-PSI concrete (above 5,000 PSI) requires a soft bond segment. The matrix wears away faster, continuously exposing fresh diamond crystals. If you run a hard bond blade on hard aggregate, the diamonds glaze over and you’re essentially grinding with a steel disc. Conversely, soft aggregate in low-PSI concrete (below 3,000 PSI) needs a hard bond blade, or the segment will wear down before the job is half finished.
- Granite aggregate (hard): Use soft bond, high-diamond-concentration blades at reduced RPM
- Limestone or river gravel (medium): Standard bond, mid-range RPM, wet cutting preferred
- Recycled aggregate or lightweight mix: Hard bond, monitor segment wear every 50 linear feet
- Reinforced slabs: Rebar-rated blades with continuous rim or turbo segment for heat dissipation
- Post-tensioned slabs: GPR scan required before any cut — no exceptions
For projects involving plumbing access or utility trenching, understanding slab composition also affects cost and timeline. You can see exactly how those variables play out in real-world Miami projects by reviewing what concrete cutting for plumbing actually costs and how long it really takes.
Wet Versus Dry Cutting and Why the Answer Is Almost Always Wet
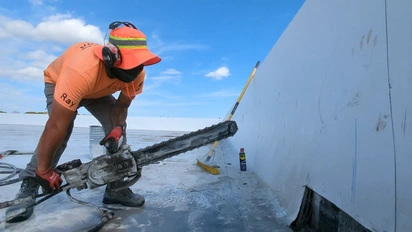
Dry cutting with a segmented diamond blade is permitted in short, intermittent passes — typically no more than 30 seconds of continuous contact before lifting the blade to allow heat dissipation. Beyond that, you’re cooking the segment bond and warping the steel core. On outdoor cuts in open air with adequate dust suppression equipment, dry cutting can work for shallow scoring passes. But for any cut deeper than 1.5 inches, wet cutting is the professional standard.
Water serves three simultaneous functions during a concrete cut of saw. It cools the blade, preventing thermal stress fractures in the diamond segments. It flushes slurry out of the kerf, reducing blade drag and improving cutting speed. And it suppresses respirable silica dust, which is a OSHA-regulated airborne hazard that carries serious long-term health consequences for operators. If your operation isn’t using either wet cutting or a HEPA-equipped dust shroud system, you’re not just cutting corners — you’re violating federal safety standards.
Water flow rate matters too. The standard minimum for a 14-inch flat saw blade is 0.5 to 1 gallon per minute per blade side. Run too little water and you get localized thermal damage. Run too much and you create excessive slurry buildup that clogs the kerf and causes blade binding. Dial in your water supply before you make the first pass.
Depth Staging for Multi-Pass Concrete Cuts on Thick Slabs
Attempting to reach full cut depth in a single pass is one of the most common ways to destroy a blade and overload a saw motor. The correct technique for any slab over 4 inches thick is staged depth cutting — a method where you make multiple passes at incrementally increasing depths until you reach the target.
For a 6-inch slab, the staged approach looks like this: first pass at 2 inches, second pass at 4 inches, third pass at full depth of 6 inches (or 6.25 inches if you’re cutting through to break free). Each pass allows you to inspect the kerf for blade tracking, confirm there’s no rebar interference, and verify that the blade is cutting freely rather than grinding. Forced depth cuts generate lateral pressure on the blade core, which causes wobble, widens the kerf, and in worst cases causes segment loss — a catastrophic failure mode that can eject a segment at over 200 mph.
On demolition projects where full-depth cutting through thick structural slabs is required, the staged method also gives you control points to reassess whether a flat saw is still the right tool, or whether a wall saw or wire saw system would be more efficient. For complex demolition scenarios in sensitive environments, the approach used in construction and demolition in Golden Beach done right with zero environmental shortcuts demonstrates how tool selection and depth management work together in high-stakes projects.
Blade RPM, Feed Rate, and the Physics of Cutting Speed
Surface feet per minute (SFPM) is the metric that actually governs how efficiently a diamond blade cuts. SFPM is determined by both the blade diameter and the spindle RPM. A 14-inch blade running at 2,800 RPM generates approximately 10,300 SFPM — within the ideal range for most general concrete cutting applications. Drop below 8,000 SFPM and you lose cutting efficiency. Exceed 13,000 SFPM on a blade not rated for high speed and you risk catastrophic failure.
Feed rate — how fast you push the saw forward — is equally critical. Too fast and you overload the segments, causing premature wear and potential blade stalling. Too slow and you generate excessive heat without productive cutting. The correct feed rate varies by concrete hardness, blade diameter, and depth of cut, but a practical field rule is this: if the saw motor is laboring audibly or the blade is slowing under load, you’re feeding too fast. If the blade is spinning freely with almost no resistance and you’re not making progress, you may be glazed — stop and dress the blade on an abrasive material like asphalt or a dressing stick.
Proper joint cutting protocols for control joints and expansion joints require especially precise feed rate management because inconsistent speed creates wavy cuts that compromise joint sealant performance. Review the technical standards at joint cutting protocols for specification-grade requirements on joint geometry and timing.
Solving the Three Most Common Concrete Cut of Saw Problems in the Field
Even experienced operators run into repeatable problems. Here’s how to diagnose and fix the three most common issues without losing half a workday.
- Blade wandering off the cut line: Usually caused by uneven blade pressure from a worn arbor flange, a blade mounted off-center, or operating with too much side pressure. Check flange flatness with a straightedge, re-seat the blade, and guide the saw with consistent two-hand pressure rather than steering it.
- Excessive vibration during cutting: This is almost always a blade core issue — either a bent core from previous thermal stress or a segment that has partially detached. Stop immediately, remove the blade, and inspect. Never continue cutting with a vibrating blade.
- Kerf closing after the cut: This happens in green concrete that hasn’t fully cured, or in slabs with high internal stress. It means your timing is off — you’re cutting too early after pour. For control joint timing specifically, the window is typically 4 to 12 hours after finishing, depending on mix design and ambient temperature. Cutting too late means raveling; cutting too early means kerf closure.
For residential applications where these issues arise in driveways, pool decks, or interior slabs, the residential concrete cutting resource library covers timing, blade selection, and finish quality standards relevant to homeowner-facing work. And if you’re working on a project that involves removing an indoor pool structure — one of the most complex residential concrete cutting scenarios — the full methodology is covered in detail at say goodbye to your indoor pool.
How Cut Quality Directly Affects Property Value and Project Outcomes
A ragged, over-wide, or misaligned concrete cut of saw isn’t just an aesthetic problem. On structural slabs, poor cut geometry can compromise load transfer at control joints, allowing differential movement that cracks adjacent panels. On decorative concrete, a wandering cut destroys the design intent and requires costly patching that rarely matches the original surface. On plumbing or utility trenches, an oversized kerf means more backfill, more patching material, and a finished surface that telegraphs the repair for years.
Property buyers and inspectors notice concrete quality. Visible repair lines, mismatched patches, and cracked control joints are red flags during real estate transactions. The connection between professional concrete work and measurable property outcomes is documented in the property value case studies, which show how precision cutting and proper joint management affect appraisal outcomes in South Florida’s competitive market.
The bottom line is that a concrete cut of saw done correctly — with the right blade, the right depth staging, the right water flow, and the right feed rate — is invisible when the job is done. The slab looks like it was always that way. That’s the standard every professional crew should be working toward, and it’s entirely achievable when the technical fundamentals are locked in before the first engine starts.